Showing posts with label food. Show all posts

Produce and Farming

If you’ve been following along you’d know Andrew and I eat organic and clean our home using organic homemade products. Along with anything else to keep unwanted, unnecessary chemicals out. We’ve been going strong for about a year now and its been one of the greatest decisions we’ve made.

Our eating and grocery shopping habits went from night to day in just a short period of time. We stopped eating all fast food, we then started reading labels in the grocery store and purchasing grass-feed beef and free range chicken. Over the past 9 months we both have become more knowledgeable in exactly what we’re feeding our bodies.

This summer we started looking outside the grocery store, by starting our own organic garden. Its been difficult due to our lack of space. Majority of our plants are in containers and get limited sunlight a day.

DSCN5154

This tomato plant has been our shining star, we started him from seed and he now tops 5 feet tall! Our lemon tree is also thriving along with a bell pepper or two. Before summer is over I’d like to get an herb garden started.

Soon our tomatoes, lemons and herbs will find their way into my kitchen. But its not enough to keep me out of the produce section at the grocery store.

Andrew and I started asking ourselves, how organic is our produce from the grocery store? I don’t know the farmer, plus and many fruits and vegetables are from other countries. We started talking about other options, such as farmers markets and local farmers that practice growing organic fruits and vegetables.

We stumbled upon a farmer named “Organic Jack”, who has a farm less than 30 minutes from our home. Not only is he local but his team efforts with another farmer have the ability to keep their customers away from the super market. If you’ve been to your local grocery store lately and looked at their organic section I’m sure you wouldn’t find a wide selection of organic produce.

Andrew talked to organic Jack over the phone and a few days later we were scheduled for a tour of his farm. Long story short, we signed up with him to have our produce delivered every two weeks.

food basket

Monday we received our first produce box of goodies along with an order form for the next box in two weeks.

Last night I made a spinach salad, the same spinach salad I’ve been eating for the past 3 months but last night it was completely different. A whole new taste. That’s how I knew organic produce from the grocery store and organic produce from my farmer are absolutely different.

vegetables

fruit and vegetables

Its nice to know you’ve shook the hand of your farmer! Next we’d like to find ourselves a local butcher.

Have you stared a garden this summer?

Scramble

I love spinach – plain and simple! I’ve had my healthy dose of spinach lately – kind of an odd pregnancy craving you could say. I’ve even started substituting the lettuce on my burger for this leafy green.

However this morning we’re going to talk breakfast!

DSCN4886

eggscramblerecipe

Happy scrambling!

The Best Pizza I’ve Ever Had

And it came from my kitchen!

DSCN4793

You could say I’m a picky pizza eater. Very rarely I’ll make a pizza at home because it seems I can never mask the talents of pizza pro’s. Until I decided to try making a pizza with white sauce and using fresh dough from Nugget Market. I’m happy to say my local pizza joint on the corner just lost their most loyal customer.

White Pizza

Pizza:
Sweet or spicy Italian sausage, uncooked
Baby portabella mushrooms, sliced
Sliced black olives
Mozzarella cheese
Green onion, chopped
Fresh basil, finally sliced
Italian seasoning
Freshly made pizza dough

Garlic White Sauce:
4 garlic cloves, pressed
1 tablespoon butter
½ – ¾ cup heavy whipping cream
1 teaspoon all-purpose flour
¼ cup parmesan cheese, finely grated 
Black pepper
Italian seasoning
Salt
Garlic powder

1. Preheat oven to 500°. Insert pizza stone.
2. Remove casings from sausage, add to a skillet over medium heat. With spatula break into small pieces. Once sausage is thoroughly cooked, discard grease and set sausage aside on a plate. In the same skillet sauté sliced mushrooms, over low heat cook until soft.
3. Meanwhile roll out dough on a floured surface, set aside.
4. In a saucepan over low heat combine butter and flour to make a roux. Add cream starting with ½ cup and pressed garlic. Whisk together. Next add black pepper, salt, Italian seasoning, and garlic powder to taste. (Sorry I don’t have exact measurements, gradually add the seasonings until your taste buds are satisfied.) Continue whisking over low heat until all ingredients are combined. Add remaining cream if the sauce becomes too thick. 
3. Remove hot pizza stone from oven. Place dough directly onto the stone then ladle white sauce onto the surface. Add ½ of the mozzarella cheese, then sausage, cooked mushrooms, and olives. Then add remaining cheese. Next top with green onion and fresh basil. Sprinkle lightly with Italian seasoning.     
4. Bake for 10-12 minutes or until crust is golden brown and cheese is melted. Allow pizza to cool for 5-8 minutes before cutting.

PSSST! Here are some of my homemade pizza tips and tricks:
1. Use a pizza stone to cook your pizza. Heat the stone inside your oven as it preheats.
2. Mozzarella! Gourmet 100% whole milk mozzarella is the only way to go.
3. If your toppings include mushrooms, try precooking them in a skillet prior to topping on your fresh pizza. Mushrooms hold a lot of moisture! Unless you want a watery soggy pizza, try precooking them first.

So tell me, what are your homemade pizza cooking tips and tricks?

Blueberry Bliss

I love the fact that spring is right around the corner. But I love even more that a majority of our garden is planted and growing like a weed in our little greenhouse, I can’t wait to cook and eat my own veggies and fruit.

Speaking of fruit I have a yummy recipe from Smitten Kitchen.

DSCN4733

Blueberry Crumb Bars

1 ½ cups white granulated sugar
1 teaspoon baking powder
3 cups all-purpose flour
2 sticks of cold butter, cubed
1 egg
¼ teaspoon salt
Zest and juice of one large lemon
4 cups of fresh or frozen blueberries (I used frozen)
4 teaspoons of cornstarch

1. Preheat oven to 375°. Grease a 9x13 inch baking dish.
2. In a medium bowl, stir together 1 cup of white sugar, baking powder and flour. Mix the salt and lemon zest in a small bowl then add to the flour mixture. Using a fork or pastry cutter blend in the butter and egg. Dough should be crumbly. Pat half of the dough into the prepared pan.
3. In another bowl combine; sugar, cornstarch (I was out of cornstarch and used flour), and lemon juice. Gently mix in the blueberries. Sprinkle the blueberries evenly over the crust. Crumble remaining dough over the berry layer.
4. Bake in preheated oven for 45-55 minutes, or until top is slightly golden brown. Cool to room temperature then cover and refrigerate for 1-2 hours before cutting into squares.  
Recipe from: Smitten Kitchen

I’ve been eating these for breakfast and dessert with a little vanilla ice cream, they’re so good! Now go make some already.

Soup

Mornin’. How was your weekend? The weather was dark and rainy all three days, I didn’t leave the house once. It felt good to lounge around in my PJ’s all weekend, another reason why I love the rain.

Yesterday was a much needed day for a warm bowl of soup. Using ingredients on hand I whipped up a simple but satisfying bowl of goodness.

Soup!

There are so many possibilities; add zucchini, peas, squash, even substitute the pasta for rice or barley…below is my exact recipe.   

Vegetable Soup with Orzo Pasta
2 tablespoons extra-virgin olive oil
1 medium white onion, chopped
1 large carrot, peeled and chopped
2 celery stocks, diced
5 baby portabella mushrooms, chopped
1 teaspoon dried rosemary
½ teaspoon garlic powder
½ teaspoon onion powder
¼ cup basil leaves, chopped
¼ cup Italian parsley, chopped
3 garlic cloves, minced
1 can (14 ounces) Italian style diced tomatoes
1 cup pinto grigio
10 cups chicken stock
¾ of a pound of orzo
2 bay leaves
Salt and pepper
Fresh grated parmesan cheese
Croutons

1. In a large stock pot heat olive oil then add; onion, carrot, celery, mushrooms, rosemary, garlic powder, onion powder, basil, parsley and garlic. Cook vegetables until tender approximately 8-10 minutes on medium to low heat, covered.
2. Add tomatoes and their juices along with the white wine. Continue to cook for another 3-5 minutes with lid removed.  
3. Stir in chicken stock, orzo and bay leaves. Bring to a boil, then reduce heat and simmer for 20 minutes or until orzo is completely cooked. Season with salt and pepper. (Keep extra chicken stock on hand just, you may need to add more broth.) 
4. Ladle into bowls, top with croutons and freshly grated parmesan cheese.

Enjoy your Monday.

This recipe has been linked to Funky Junk Interiors Saturday Nite Special

Pumpkin & Walnuts

Pumpkin Bread with Walnuts

Who loves pumpkin bread? A slice lightly toasted with butter and a cup of hot tea is the perfect way to start off a fall morning!

Pumpkin Bread with Walnuts
1 ½ cups all-purpose flour
1 ½ teaspoon ground cinnamon
1 teaspoon baking soda
1 teaspoon salt
1 teaspoon ground ginger
½ teaspoon ground nutmeg
¼ teaspoon ground cloves
¼ teaspoon baking powder
5 tablespoons of milk or water
½ teaspoon vanilla
½ cup coarsely chopped walnuts
2 eggs
1 cup pumpkin puree
1  1/3 sugar
6 tablespoons butter

1. Preheat oven to 350°F and grease a loaf pan.
2. Whisk together the dry ingredients thoroughly; flour, cinnamon, baking soda, salt, ginger, nutmeg, cloves, and baking powder. In a large bowl combine milk or water and vanilla. In a separate bowl add butter, beat until creamy. Gradually add sugar to the butter and beat until lightened in color, about 3-4 minutes. Then add one egg at a time to the butter mixture. Next add the pumpkin puree.
3. Gradually add the flour mixture in three parts, alternating with the milk mixture in 2 parts. Beat on low or stirring with rubber spatula until smooth. Fold in walnuts, scrape the batter into the pan and spread evenly. Sprinkle with extra walnuts and sugar for the top.
4. Place in oven for approximately 1 hour or until a toothpick inserted into the center comes out clean. Let cool on wire rack for 5-10 minutes.
Recipe courtesy of: Joy of Cooking

Afternoon Snack

Hungry? I have the most delicious snack you could ever ask for. That is if you love marinated artichokes as much as I do. Its even better than a snack, it could be a delicious appetizer.

Best snack, ever.

If you decide to make this lunch, like me – you may have to double the recipe!

Artichoke-Lemon Pesto with Crostini
1 small jar marinated artichoke hearts, roughly chopped
1-2 teaspoons olive oil
¼ cup Italian parsley, minced
2 cloves of garlic, pressed
1 tablespoon fresh parmesan cheese, grated
Juice of ½ a lemon
1-2 dashes of cayenne red pepper
Salt and pepper
3-4 slices of French bread or baguette

1. In a medium size bowl combine, artichoke hearts, olive oil, parsley, garlic, parmesan cheese, lemon juice, red pepper, salt and pepper. Mix well.
2. Drizzle bread slices with olive oil season with salt and pepper. Sprinkle lightly with parmesan cheese. Broil bread until golden brown.
3. Top golden brown bread with pesto mixture.
Enjoy!

August Peaches

I can hardly believe summer is almost over! I do have to say I'm ok with it, the fall and winter months happen to be my favorite time of the year.

So do you have any end of summer plans? I’m thinking end of summer dinner party, I have the perfect dessert. Peach Crostata!

Sweet peaches

Pastry doughA bowl of goodness

I started making the dough first (in the directions below the it tells you to roll the dough into 1, 12” diameter disk. Instead I cut the dough in half and had two 6-7” diameter disks of pastry, its your choice). Then I mixed the peach mixture. You can’t really go wrong with peaches, sugar, and cinnamon. Yum!

These guys are ready for the oven

Wrap those peaches up in their little blanket and pop them into the oven!

So gooy and sweet

Less than an hour you’ll have this.

One with nuts one without!

Happy baking!

Peach Crostata
¼ cup granulated sugar
4 teaspoons all-purpose flour
¼ teaspoon ground nutmeg, or cinnamon
2 cups sliced peaches
Juice from ½ of a fresh lemon
1 tablespoon sliced almonds
Milk
Granulated sugar
Pie crust (see below)

1. Preheat oven to 375°. Line large baking sheet with parchment paper; sprinkle lightly with flour. Prepare pastry for single pie crust or two smaller pie crusts, roll into a circle and set aside.
2. For filling, in a large bowl, stir together ¼ cup sugar, flour, and cinnamon or nutmeg. Add peaches and lemon juice, toss gently to coat. Mound the filling in the center of the pastry, leaving the outer 2 inches uncovered. Fold uncovered pastry over the filling, pleating will be necessary to keep the pastry flat against the fruit.
3. Lightly brush top and sides of pastry with milk. Sprinkle with almonds and additional sugar.
4. Bake for 50 to 55 minutes or until pastry is golden brown and filling is bubbly. If necessary cover pastry with foil during the last 5 to 10 minutes to prevent overbrowning. Cool on baking rack for 30 minutes.
Serve warm with ice cream.

Pie Crust
1½ cup all-purpose flour 
½ teaspoon salt 
½ cup shortening 
2-3 tablespoons cold water

1. Combine the flour and salt in a mixing bowl and toss together. Add the shortening. With your fingertips, 2 knives or a pastry blender, blend the ingredients together, working quickly, until you have a mixture of tiny, irregular flakes and bits about the size of coarse bread crumbs. Sprinkle on the water, 1 tablespoon at a time, stirring gently with a fork after each addition. Add just enough water for the dough to form a rough mass.
2. With floured hands, pat the dough into a smooth disk (or into 2 disks, one just slightly larger than the other, if you are making a double-crust pie). The dough is now ready to use. It is not necessary to refrigerate the dough before rolling out (unless you included some butter), although for convenience it may be covered with plastic wrap and refrigerated for up to 2 days.
3. Roll out the dough on a floured surface (using the larger piece for the bottom of a double-crust pie) until it is about 12 inches in diameter and 1/8 inch thick, or about 2 inches wider than the top of the pie dish. Try to keep the dough as round as possible.
4. Transfer the rolled-out pastry to the pie dish. Pat the pastry in around the edges to fit the shape of the dish. If you are making a double-crust pie, roll out the remaining pastry for the top crust and set it aside on waxed paper.
Recipes from: Better Homes and Gardens and Williams Sonoma

Wedding Chicken

My favorite and very easy chicken recipe. I don’t know what its original name used to be, or if it even had one. Its been known as wedding chicken all my life! My grandma once made this dish for a wedding, totaling over 100 baking dishes…so ever since it’s been known as ‘Wedding Chicken’. 

Lets get started!

Seasoned chicken

Don’t skimp on the butter now!

Chardonnay!

Add the wine, but be sure to save a glass (or two) for you.

Time to bake

The chicken is seasoned and ready for the oven. Oh, and your house will smell wonderful once it starts baking!

The smell makes your mouth water

Remove after the first hour of baking, marry the potatoes with chicken. Halfway done.

Bake one more hour.

DSCN2612

Remove from the oven and enjoy!

Wedding Chicken
1 package each, chicken thighs and drumsticks
2 potatoes diced, red or brown (your choice) with skin on
5 tablespoons (approximately) butter
1 bottle of Chardonnay
1 cup soy sauce
Salt, pepper, paprika, and garlic powder

1. Heat oven to 350°
2. In a large baking dish (you may need two) place clean washed chicken spaced out. Add slices of butter to each chicken piece then season with salt, pepper, paprika, and garlic powder. 
3. Add wine to baking dish until approximately ½” deep, then pour in soy sauce.
4. Cover with tin foil and place in oven for 1 hour.
5. Remove baking dish from oven, discard the foil. Add chunks of potatoes around the chicken. Lower oven temperature to 325°, cook chicken uncovered for 1 additional hour.
6. Remove chicken from the oven, serve hot!

The Italian Sandwich

Yo! You want some meat-a-balls? Your in luck, I’m sharing my Italian families recipe. But shh…don’t tell grandma!

Meatball sandwich love

Ok, this is a pretty simple Italian meatball recipe. Plus you’ll have extra sauce and meatballs left over for spaghetti tomorrow night.

Meatball mixture

Sauce 

Start by chopping and dicing. Have a bowl ready for the meat balls, and a Dutch oven for the sauce.

Happy little meatballs

They’re almost ready to go in their tomato sauce bath.

Tomato sauce Ready to go in the oven

Pop them in the oven, and in about an hour you’ll have a tasty sandwich.

Dinner is served!

Italian Meatball Sandwiches 
Meatballs:
1 lb ground meat
1 celery stalk, finely chopped
¼ cup fresh parsley, diced or ½ tablespoon dried parsley
1 medium white onion, finely chopped
3 cloves of garlic, minced
¼ cup fresh parmesan cheese, grated
1 egg
salt & pepper

Sauce:
1 tablespoon olive oil
1 celery stalk, finely chopped 
1 tablespoon fresh parsley, diced or ½ tablespoon dried parsley
1 medium white onion, finely chopped
3 cloves of garlic, minced
1 (1lb 13oz) can tomato sauce
1 teaspoon Italian seasoning (oregano, rosemary, basil)
3-4 shakes of Worcestershire sauce
1 beef bouillon cube 
1 cups water
1 bay leaf

White rolls
Swiss cheese, sliced
Cayenne pepper (if desired)

1. Preheat oven to 350°.
2. In a large bowl combine all meatball ingredients. Using your hand mix for 1-2 minutes. Then form round balls, about the size of golf balls. Then set them aside.
3. In a medium size Dutch oven combine all sauce ingredients and stir.
4. Add the meat balls to the sauce, then place in the oven. Cook for 1 ½ hours.  Uncovered.
5. Remove pot from the oven. Place a few meat balls on a plate and slice with a sharp knife. Add a spoon full of tomato sauce onto the white roll, then add the slices of meatball. Top with cayenne pepper (if desired) and Swiss cheese. Buon appetito!

Have a great weekend!

Heaven in a Jar

Creme Brulee

Chocolate Crème Brûlée.

This was my first time making crème brûlée, and I’m in love. Sorry Andrew!

Now come on, you don’t have to spend triple the price in a 5-star restaurant for this rich velvety dessert. You’d never imagine simple everyday ingredients combined make this treat!

Start with chocolate.

Chocolate

Heavy cream

Chocolate cream!

Mix with heavy cream…

Eggs and sugar

Yum

Now add eggs and sugar!

Ramekins in hot water bath

Pour chocolate custard into ramekins. This recipe is perfect for two medium size ramekins or four smaller ones.  Place inside a baking dish and add boiling water. Then bake!

Cooling off

Topped with brown sugar

The classic crème brûlée calls for a sprinkle of white sugar, however I used brown sugar for a caramel glaze. Usually you would  use a normal kitchen torch to heat the sugar, Andrew and I used his “manly” torch from the garage.

Heat with a torch

It worked just fine and he was much happier that way!

Finished!

Pretty simple, huh? (Of course I’ll post the exact recipe below.) Just think, this jar of heaven could be waiting for you once you get home from the office or running errands and cleaning house.

Chocolate Crème Brûlée
2 cups heavy cream
3 oz. bittersweet chocolate, chopped
3 egg yolks
6 tbsp. granulated sugar
1 tsp. vanilla extract

1. Preheat oven to 325°, and have a medium size pot of boiling water ready.
2. Heat heavy cream in a saucepan over medium heat, just until the sides start to bubble. About 2-3 minutes, then remove from heat and stir in chocolate. Mix until chocolate is blended.
3. In a medium bowl, add egg yolks and sugar. Whisk until the mixture is pale yellow and forms thick ribbons, about 5 minutes. Then slowly stir in the chocolate cream and vanilla. Strain through a fine-mesh sieve into a large bowl.
4. Divide chocolate custard into ramekins and place into a 3-inch deep baking pan. Add the boiling water to fill the pan, about halfway up the sides of the ramekins. Cover the pan loosely with aluminum foil.
5. Bake for 25-30 minutes, or until the edges are set. The center will be soft. Remove ramekins from hot water bath and allow to cool on wire rack until room temperature. Cover with foil and refrigerate minimum of 4 hours.
6.  Prior to serving, sprinkle top evenly with brown sugar. Using a kitchen torch, move the flame in small circles over the surface until sugar caramelizes. About 30 seconds and serve immediately.
Recipe from: Joy of Cooking Cook Book


Spring Soup

I’ve been going against doctors orders to have my wisdom teeth taken out due to the countless horror stories from friends (thanks guys)!

Until a few days ago, when I had all four yanked out. It was a walk in the park dream in la la land, I can honestly tell you I don’t remember a thing. While I was waking up from the anesthesia, all I was concerned about was wither or not I could eat cupcakes. Or so I was told.

Its been a few days, and no I have not had a single bite of a cupcake. However, before my surgery I made a lentil soup and I wanted to share my recipe.

Lentil soup

Lentil Soup
1 package Italian sausage (sweet, mild or spicy)
1 tsp. olive oil
1 cup (medium size) white onion, diced
1 cup parsley, chopped
1 cup carrots, diced
1 cup celery, diced
4 cloves of garlic, minced
½ of (12 oz) jar roasted red bell peppers, roughly chopped
1½ cups green or brown lentils
4 cups water
salt and pepper
2 cans (14 oz.) vegetable broth
1 can (14 oz.) diced tomatoes with garlic & oregano
2 bay leaves

1. Heat large stock pot over medium-low heat, meanwhile remove casings from sausage and add to pot. Once browned add; oil, onion, carrots, celery, and garlic. Sauté until vegetables are soft, about 10 minutes.
2. Add roasted peppers, lentils, water, salt and pepper, broth, parsley and bay leaves to the meat and vegetables in the pot. Bring to a boil, then reduce to a simmer.
3. Cook for 1½ to 2 hours or until lentils are soft. Serve with French bread!

Recipe Book

As you can tell, my shelf full of recipe books and clippings was starting to get out of control.

Before

I’m a little embarrassed I’m showing this but I figured I can’t be the only one. I’m the kind of person who makes copies and rips out recipes in magazines then shoves them in my cabinet and forgets about them.

Until now!

It took a long time, and I realized I have more recipes then I actually do…but I typed each one by hand on word. Printed them on some nice card stock, then cut to my preferred size. Next, I made a cover and a back cover out of  thick card stock, and bound all of the pages together with binding rings. The two in the below picture are a little big for my liking, so I’ll probably replace them with some smaller ones and use the larger rings when I add even more pages.

The Book

I think I'll be more prone to using the recipes now, plus I also included a majority of family recipes that I know by heart. Now I’ll never forget them and my mom and grandmother wont be getting those random phone calls from me… “I can’t remember do I use ziti or penne?”.

After

Oh! And I almost forgot, I wanted to share my red velvet cupcake recipe from the other day

Red Velvet Cupcakes

Recipe

1 1/3 cups all-purpose flour
2 tablespoons unsweetened cocoa powder
¾ teaspoon baking powder
¼ teaspoon baking soda and salt
½ cup (1 stick) butter, softened
¾ cup sugar
2 large eggs
½ cup buttermilk
1 tablespoon liquid red food coloring
1 teaspoon vanilla extract
½ teaspoon vinegar

Heat oven to 350 degrees. Line muffin pan with paper liners.

In a small bowl, whisk flour, cocoa, baking powder, baking soda, and salt. In a large bowl, with an electric mixer on medium speed, beat butter and sugar until light and creamy. Add eggs one at a time. In a glass combine buttermilk, food coloring, vanilla, and vinegar. With mixer on low beat the liquid into the large bowl, alternating with flour mixture. While scraping bowl occasionally.

Divide batter into muffin cups. Bake for 18-22 minutes. Let cool on wire rack before icing.


Enjoy the rest of your weekend, stay warm!

Getting Our Jamba On

Have you tried the new(ish) Ideal Meals at Jamba Juice lately? They're delicious and worth the $5. Well, I kind of have an addiction to them now...so those $5 are adding up. Quickly!

How hard can it be to make these little things? So I pulled out the blender and headed to the store, I purchased all the ingredients for under $15. (See recipe below.)

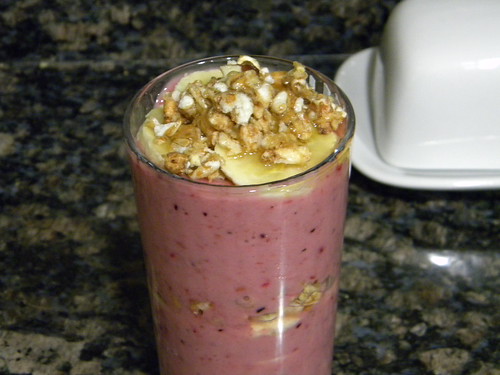
BerrySmoothie


Plus next week Andrew and I are starting our fitness training. Now we'll have a healthy morning snack before our run or bicycle ride.

Our training was supposed to start last week, err...or the week before, but its been non-stop rain here for the past 9 days. So today is the first sunny day...and guess where I am? Work for the next 4 days. Yuck!

When the training starts it will go on for the next couple of months, I'm going to be training and exercising with Andrew. He needs to be in tip top shape for his (possibly) new job in law enforcement. So I'll be his motivator, plus there might be a wedding soon, so I might as well get in shape and eat healthy too.

Berry and Banana Smoothie with Granola*
1 cup frozen mix berries, or fresh
¼ cup soy milk
1 banana, sliced
1 to 1 ½ cups plain or vanilla yogurt
1 handful of your favorite granola (I used Kashi and it was great!)
Honey for some added sweetness (optional)

Toss mixed berries, soy milk, yogurt, and half the banana into the blender. Liquify. Pour into a glass and top with granola, remaining banana, and honey.

*I honestly just eyeballed these measurements, its a smoothie...how much can you really get wrong? :)


Have a beautiful day!

Something Other Than Apple Pie

I wanted to share my very easy and creamy cheese cake recipe before the holiday tomorrow.


Graham cracker pie crust
2 bars of cream cheese
1 can of Eagle Brand sweetened condensed milk
1 teaspoon of vanilla extract
½ tablespoon of lemon juice

In a large mixing bowl combine cream cheese, condensed milk, vanilla, and lemon juice. Blend with an electric mixer until smooth. Next, spoon the batter into the pie crust and make sure everything is even. Place in the refrigerator, and the cheese cake will be ready in 6-8 hours. Enjoy plain or top with fresh fruit…or even chocolate.
DSCN0133

Happy Thanksgiving!